I’ll try and make this short and sweet. I’m not trying to turn this into a recipe where you need to scroll through 20 screens of backstory just to figure out how much flour you need.
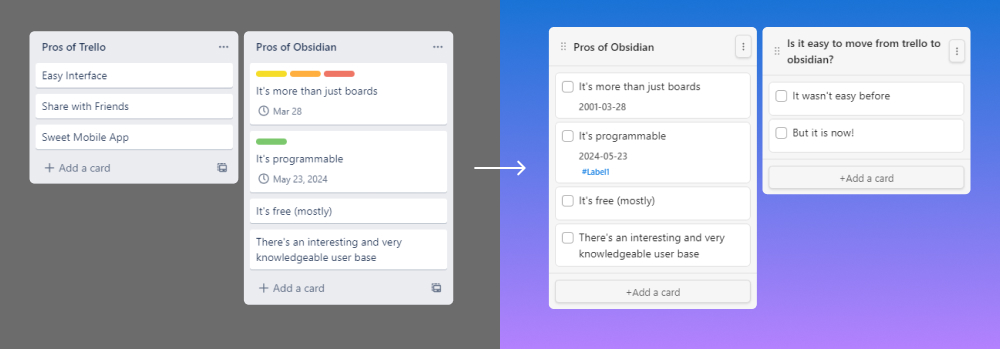
In fact. If you know what bookmarklets are, are using obsidian, and have some things stuck in Trello because it’s a pain to get stuff out, then just drag this link (Trello –> Obsidian) to your browser bookmarks and go to town. You’ll probably figure it out. If that’s not enough, jump to how to use it and ignore all the beautiful time I lost to padding out the rest of this post.
Otherwise, here’s 20 screens of backstory.
Why obsidian?
I’ve been an avid user of Obsidian (A second brain, for you, forever. As their tagline says.) for a couple years. There are few apps that have ever affected my productivity as much as obsidian has. I’m not going to go into detail about how it helps me to better organize and connect everything that I’ve ever written, or how it has created a better system for maintaining and helping me act on tasks and projects because there’s a lot of coverage on the internet for those sorts of things. In fact, here are a few:
- How to use Obsidian Notes: a step-by-step guide by Elizabeth Butler, MD, PhD
- Notion vs. Obsidian Notes by Jimmy on The Productive Engineer
- Obsidian vs. Roam vs. LogSeq by Mike Schmitz on The Sweet Setup
What’s a boookmarklet, you ask?
Remember the time before Chrome Extensions existed? If you just asked me what a bookmarklet is, then you clearly don’t. I get it, I might be old.
Before browser extensions, the best we had were bookmarklets - bookmarks that contained a bunch of JavaScript code that could run on any page. They didn’t need to be installed, they didn’t ask for crazy permissions, and they didn’t run all the time collecting data on every page you visited.
They still don’t. And I think they still have a place in the modern web.
I vented about this a little bit recently when I wrote a bookmarklet for copying YouTube links with specific timecodes in markdown so I could use them in Obsidian.
The following chart shows Google search trends for “Bookmarklet” over the last 5 years and their down-trend following the launch of Chrome Extensions.
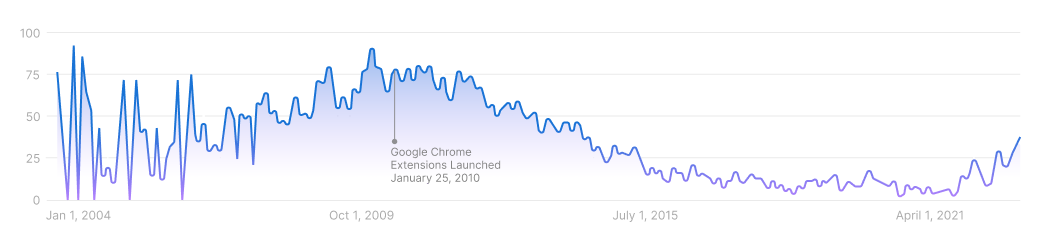
Source: Google Trends United States 01 Jan 04 - 01 Apr 23
What’s that bit of uptick at the end? Maybe we are on the verge of a resurgence and that people are starting to realize they don’t need a Pinterest Extension or a collection of useless tools mucking up their browser UI just to quickly add quirky DIY projects to your future dream home projects - especially with many extensions overstepping their usefulness.
Are bookmarklets safe? Specifically this one?
I’m glad you’re asking these questions. You should be. Again, smarter people something something:
- Browser Extensions Are A Privacy Nightmare by Chris Hoffman on How-To Geek
- Why you should be careful with browser extensions by Alex Perekalin on Kaspersky
As for what exactly this bookmarklet is doing, you’ll just have to look at the code to find out. Spoiler alert, its doesn’t do anything other than pull stuff off of the page and copy it into your clipboard. So yeah, it’s safe. The bookmarklet’s code is actually minified, so here’s the full source…
The code
I don’t feel like I need to explain code as long as it’s well commented. Contrary to what this article implies, I don’t write code - which you’ll clearly see if you actually look through this.
// The variable that will store all the text, starts with the kanban board settings
var obsidianText = "---\n\nkanban-plugin: basic\n\n---\n\n";

// Something to keep track of just to display when it's copied.
var numberOfLists;
var numberOfCards;

// Get all the lists in trello
var trelloLists = document.getElementsByClassName("js-list");
numberOfLists = trelloLists.length;

// Cycle through all the lists
for (l = 0; l < numberOfLists; l++){
  // Get the list name
  var trelloListHeader = trelloLists[l].getElementsByTagName("h2")[0].innerText;

  // Append the header to obsidianText in markdown
  obsidianText += "\n## " + trelloListHeader + "\n";

  // Get all the cards in each list
  var trelloItems = trelloLists[l].getElementsByClassName("list-card");
  numberOfCards = numberOfCards + trelloItems.length;

  // Cycle through all the cards in each list
  for (i = 0; i < trelloItems.length; i++){

    // Get the card title
    var trelloItemTitle = trelloItems[i].getElementsByClassName("list-card-title")[0].innerText;

    // Grab all of the labels if they have text specified. This does not get labels that are just colors.
    var trelloLabels = trelloItems[i].getElementsByTagName("button");

    // cycle though all of labels
    for (b=0; b<trelloLabels.length; b++){
      var ariaLabel = trelloLabels[b].getAttribute("aria-label"); // aria label is formatted as aria-label = "Color:red title: "Label_Text""
      var splitAriaValue = ariaLabel.split('title: ')[1]; // Split the string to just get the title, so 0 is trash 1 is the value of 'title' “Label_Text”"

      splitAriaValue = splitAriaValue.replace("“", "") // get rid of the smart quotes
      splitAriaValue = splitAriaValue.replace("”", "") // both of them

      // Append the label to item
      if (splitAriaValue != "none"){
        trelloItemTitle = trelloItemTitle + " #" + splitAriaValue;
      }
    }

    // Get the date. We can't get the time because trello doesn't display it in the list.
    var trelloDate = trelloItems[i].getElementsByClassName("js-due-date-text");
    if (trelloDate.length > 0){ // Only work on the ones that have a date.
      trelloDate = trelloDate[0].innerText;
      var trelloConvertedDate = new Date(trelloDate).toISOString().substring(0, 10);; // Convert it to an actual date so we can change the format
      // Append the date to item
      trelloItemTitle = trelloItemTitle + " @{" + trelloConvertedDate + "}";
    }

  // Append the item (with labels and date) to obsidianText in markdown
  obsidianText += "- [ ] " + trelloItemTitle + "\n";
  }
}

// Append the final expected kanban settins
obsidianText += '\n\n%% kanban:settings\n```\n{"kanban-plugin":"basic"}\n```\n%%';

//Copy text to the clipboard
navigator.clipboard.writeText(obsidianText);


// Flash the time on the page in an overlay so that I know I clicked it.
var elemDiv = document.createElement('div');
elemDiv.innerHTML = "<h1 style='font-size:40px; color:white; text-align:center; margin-top:2em;'>" + "Copied " + numberOfLists + " Lists and " + numberOfCards + " cards. </h1>";
elemDiv.style.cssText = 'position:absolute;width:100%;height:100%;opacity:0.8;z-index:1000;background:#000;top:0';
document.body.appendChild(elemDiv);

// Have it fade out after a bit
setTimeout(function(){ elemDiv.style.display = "none"; }, 2000);
The minified code
var numberOfLists,numberOfCards,obsidianText="---\n\nkanban-plugin: basic\n\n---\n\n",trelloLists=document.getElementsByClassName("js-list");for(numberOfLists=trelloLists.length,l=0;l<numberOfLists;l++){var trelloListHeader=trelloLists[l].getElementsByTagName("h2")[0].innerText;obsidianText+="\n## "+trelloListHeader+"\n";var trelloItems=trelloLists[l].getElementsByClassName("list-card");for(numberOfCards+=trelloItems.length,i=0;i<trelloItems.length;i++){var trelloItemTitle=trelloItems[i].getElementsByClassName("list-card-title")[0].innerText,trelloLabels=trelloItems[i].getElementsByTagName("button");for(b=0;b<trelloLabels.length;b++){var ariaLabel=trelloLabels[b].getAttribute("aria-label"),splitAriaValue=ariaLabel.split("title: ")[1];"none"!=(splitAriaValue=(splitAriaValue=splitAriaValue.replace("“","")).replace("”",""))&&(trelloItemTitle=trelloItemTitle+" #"+splitAriaValue)}var trelloDate=trelloItems[i].getElementsByClassName("js-due-date-text");if(trelloDate.length>0){trelloDate=trelloDate[0].innerText;var trelloConvertedDate=new Date(trelloDate).toISOString().substring(0,10);trelloItemTitle=trelloItemTitle+" @{"+trelloConvertedDate+"}"}obsidianText+="- [ ] "+trelloItemTitle+"\n"}}obsidianText+='\n\n%% kanban:settings\n```\n{"kanban-plugin":"basic"}\n```\n%%',navigator.clipboard.writeText(obsidianText);var elemDiv=document.createElement("div");elemDiv.innerHTML="<h1 style='font-size:40px; color:white; text-align:center; margin-top:2em;'>Copied "+numberOfLists+" Lists and "+numberOfCards+" cards. </h1>",elemDiv.style.cssText="position:absolute;width:100%;height:100%;opacity:0.8;z-index:1000;background:#000;top:0",document.body.appendChild(elemDiv),setTimeout((function(){elemDiv.style.display="none"}),2e3);How to use it
Finally, we made it through all the backstory. As promised here’s what to do with this bookmarklet, if you couldn’t figure it out.
- Drag the link above to your browser bookmarks. It’s a bookmark, but the url is actually just JavaScript. That JavaScript will run on any page when you click it.
- Rename it if you feel like it
- Go to a board in Trello and click the bookmark. It will tell you how many lists and cards, in total, that it copied. If something doesn’t happen… no idea.
- Open a new note in Obsidian and make sure to view the note in source mode. I can’t stress that enough. If you copy it in some other way, it’s bound to mangle the text you’re pasting in.
- Flip over to the Kanban View (open up your Command Pallet and Toggle Kanban View)
- Enjoy
If reading isn’t your style, here’s me giving a quick overview of how to use it:
Limitations and constraints
- This bookmarklet won’t grab any description or any attached files that are in your Trello cards. Just the card name, the named labels and a due date.
- If your Trello labels aren’t titled (they’re just a color) - this will ignore them. Go in and name all your labels if you want them to be brought over.
- Obsidian’s kanban boards let you specify a time, Trello does not.
Thanks
If you made it here, as always, thanks for stopping by.
I came across a post the other day where someone was surprised that you could put JavaScript into a bookmark and run it from on any page. They even asked what to call that type of thing. I was surprised. They’re called bookmarklets and they’ve saved me on numerous occasions.
For all you folks that don’t know, before the invention of chrome extensions and browser plugins, we used to cram JavaScript into browser bookmarks so that we could do things with the pages we were using. Years ago, I made a bookmarklet for copying tweets so that they could be embedded into my own blog — long before Twitter came up with embeddable tweets.
We don’t always need a massive permission grabbing chrome extension to add some extensibility to a page. Today I’m going to show you how I made one just last weekend to scratch an itch I’d been having. If you know a bit of JavaScript, you can come up with some pretty clever ways of interacting with the code on other people’s pages.
Taking notes on YouTube videos
I played around with Memetic for taking notes on YouTube videos but I always just ended up exporting those notes into Obsidian (my second brain) and I figured I could streamline the process. The most useful feature in Memetic was adding the timestamp (and link) to the notes I was taking.
Going from Memetic and into something more useful, like Obsidian, seemed like an unnecessary step when I would normally just take all my notes in Obsidian in the first place.
I needed to fix my process.
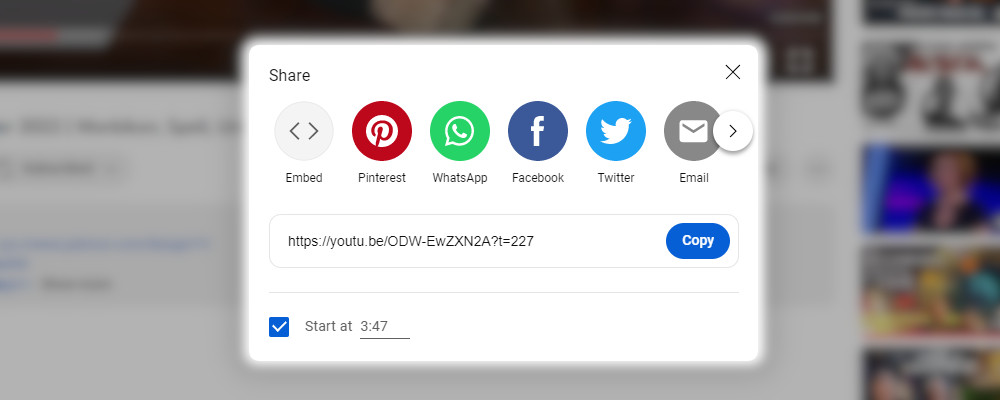
YouTube’s sharing URL
I figured that link would exist somewhere in the page on the video I was watching — I just needed to grab it and get it into obsidian. YouTube has a bit of UI that exposed that link, but I’m not opening that up, clicking a button, and copying it out every time. That does mean that information is in the code and I can work with that.
The Plan for the bookmarklet
What did I need this thing to do?
- Get the URL out of the Youtube video page
- Format it as markdown
- Copy it to the clipboard (So I can paste it in Obsidian quickly)
The code
I don’t feel like I need to explain code as long as it’s well commented:
// Function to convert number of seconds into Hours::Minutes::Seconds
function minutesSeconds(s){
	return(s-(s%=60))/60+(9<s?':':':0')+s;
}

// The Main Function
function start(){
	// Current Page
	var currentURL = window.location.href;

	// Where the data is in youtube
	var bar = document.getElementsByClassName("ytp-progress-bar")[0];

	//Converting that to data
	var seconds = bar.getAttribute("aria-valuenow");
	var secondsInMS = minutesSeconds(seconds);

	//Adding the time to the url
	var URL = currentURL + "?t=" + seconds;

	//Setting up the markdown format : [This is the linkname](link.html)
	var obsidianFormat = "[" + secondsInMS + "]" + "(" + URL + ")";

	// Put the obsidian formatted link into the clipboard
	navigator.clipboard.writeText(obsidianFormat);
	null;

	// Flash the time on the page in an overlay so that I know I clicked it.
	var elemDiv = document.createElement('div');
	elemDiv.innerHTML = "<h1 style='font-size:100px; color:white; text-align:center; margin-top:2em;'>" + secondsInMS + "</h1>";
	elemDiv.style.cssText = 'position:absolute;width:100%;height:100%;opacity:0.8;z-index:1000;background:#000;';
	document.body.appendChild(elemDiv);

	// Have it fade out after a bit
	setTimeout(function(){ elemDiv.style.display = "none"; }, 600);
}

// Start
start();
The minified code for the bookmarklet
javascript:function minutesSeconds(s){return(s-(s%=60))/60+(9<s?':':':0')+s}function start(){var currentURL=window.location.href;var bar=document.getElementsByClassName("ytp-progress-bar")[0];var seconds=bar.getAttribute("aria-valuenow");var secondsInMS=minutesSeconds(seconds);var URL=currentURL+"?t="+seconds;var obsidianFormat="["+secondsInMS+"]("+URL+")";navigator.clipboard.writeText(obsidianFormat);null;var elemDiv=document.createElement('div');elemDiv.innerHTML="<h1 style='font-size:100px; color:white; text-align:center; margin-top:2em;'>"+secondsInMS+"</h1>";elemDiv.style.cssText='position:absolute;width:100%;height:100%;opacity:0.8;z-index:1000;background:#000;';document.body.appendChild(elemDiv);setTimeout(function(){elemDiv.style.display="none"},600)}start();If I wasn’t so lazy…
Things I could do to improve this:
- Instead of hitting the bookmarklet every time, I could have injected a button into the page that I could hit every time, but I’m cool with the simplicity of this.
- Make it work with Vimeo. I tend to watch videos on there too sometimes, but rarely. Maybe next time I need to take notes on one that’s not private.
- This only works on Youtube.com, not when it’s embedded in a page somewhere else. That could potentially be helpful.
How have I never played around with hardware before? I’ve had some ideas in the past, but who has the time to sit down and learn electronics? They’re kind of complicated.
I had my first Arduino class about a week ago - two hours of learning that is outside of my wheel house. I have read some basic schematics and can tell the difference between a resistor and a capacitor but actually putting them to practical use and building circuits proved pretty tricky to wrap my head around quickly.
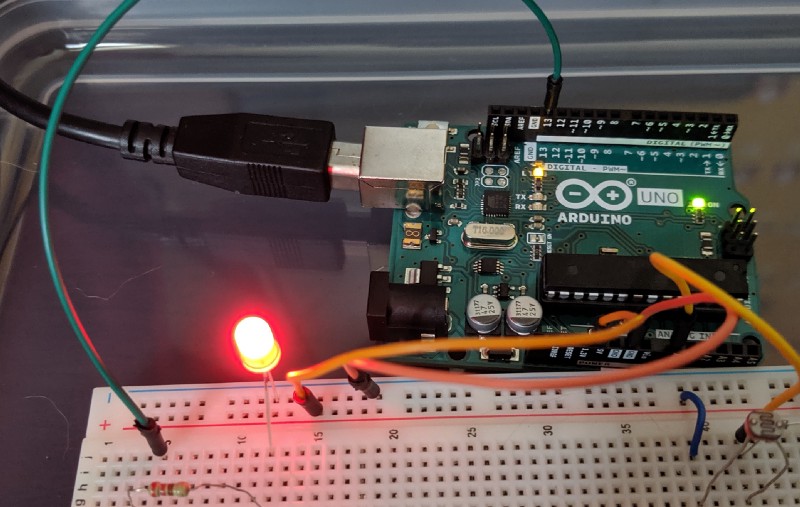
When I walked out of class, I had built my first circuit - a working LED. It was glorious. 3 days later and I sat down to rebuild it at home without instruction and I was perplexed, but I made my way back through it. Feeling a bit more confident, I set out to create 3 new projects in 1 week:
- Make an LED turn on when it’s dark and turns off when it’s bright
- Make an LED get bright when the environment gets bright (and a version that gets bright when the environment gets dark)
- Make an LED blink when the environment gets dark
I didn’t have a dedicated work space for doing this so I had to find a spare TV tray to go next to my desk - which might be its new permanent home.
This is how I got them all working.
Smart lighting
Getting an LED setup on the Arduino board is pretty straight forward and adding in a Photocell for lighting detection is almost easier.
Setup the LED
Create a circuit from Pin 13 → Resistor → LED → to Power (and ground it).
The code to get the light to turn on is incredibly simple and included as an example in the Arduino IDE. A quick YouTube search and there are plenty of videos on how to get your LED to blink.
Setup the Photocell
With the photocell, you’re going to connect the Power → Resistor → Photocell → Ground and connect that to the Pin (0) so we can read what values the photocell is receiving.
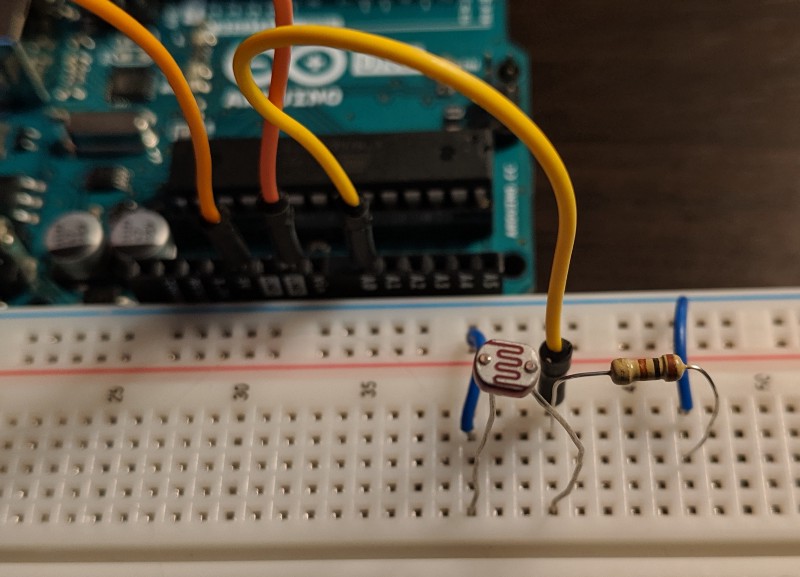
In order to get the LED to turn on and off, we’ll need to figure out the values that the photocell is receiving when it’s light vs dark. Best way to do that is to push the values to the serial port and read them in the IDE.
“Smart” lighting code
This code couldn’t get more simple:
// The pins I'm using
// For the light
int sensorPin = 0;

// For the LED
int ledPin = 13;

void setup() {
  // Start communication to get values
  Serial.begin(9600);

  // Set the LED pin output
  pinMode(ledPin, OUTPUT);
}

void loop() {
  // Get the values from the Photocell
  int sensorValue = analogRead(sensorPin);

  // Send the value to the serial port
  Serial.println(sensorValue,DEC);

  // Delay for 1 sec
  delay(1000);
}
After pushing the code to the Arduino and waving my hands over the photocell a few times, I getting the following values:
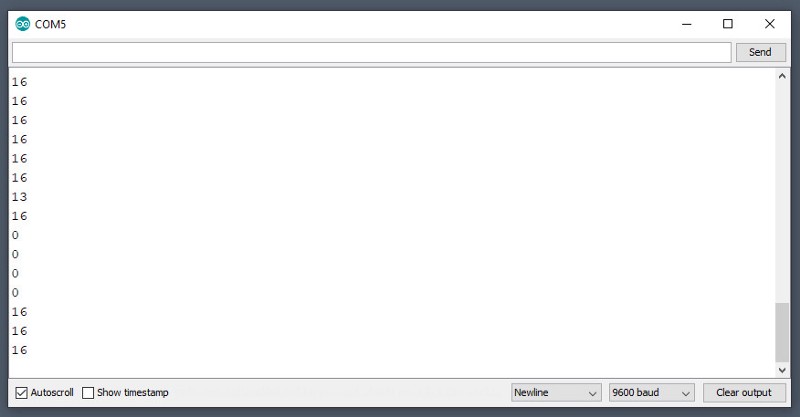
I’ll use these values to determine what’s bright and what’s dark, setting that value globally:
// The value when it's dark
int darkValue = 5;

// The value when it's bright
int brightValue = 10;
Then we can use those values to turn on / off the LED during the code’s loop:
// Check the values and determine if the LED should go on or off
if (sensorValue < darkValue){
  digitalWrite(ledPin, 1);
}
else{
  digitalWrite(ledPin, 0);
}
Pushing the code to the Arduino lets me wave my hand over the photocell to turn it on. Smart home lighting done with hardly any code.
The full smart lighting code:
// Pin# or the light
int sensorPin = 0;

// Pin# or the LED
int ledPin = 13;

// The value when it's dark
int darkValue = 5;

// The value when it's bright
int brightValue = 10;

void setup() {
// Set the LED pin output
  pinMode(ledPin, OUTPUT);
}
void loop() {
  // Get the value from the photocell
  int sensorValue = analogRead(sensorPin);

  // Check the values and determine if the LED should go on or off
  if (sensorValue < darkValue){
    digitalWrite(ledPin, 1);
  }
  else{
    digitalWrite(ledPin, 0);
   }

  // Delay for 1 sec
  delay(1000);
}
On to the next project!
Change an LED brightness based on the environment (a backlight)
What do we need to do, instead of just turning the LED on/off (setting the value of the output to HIGH and LOW), to get the LED to change it’s brightness based on the values that the photocell is getting? We’ll need to:
- Change the output to the LED to be analog so it can take more than just the On/Off values
- Figure out what the range of values we can tell the LED to be
- Map the values that we are reading from the photocell to the output of the LED
Going Analog
I don’t know why I struggled with this for longer than it should have. I kind of forgot about the whole analog vs digital part of all this - that’s what I get considering I’m only a handful of hours into learning all this.
I started by trying to write other values to the LED output, googling what values it can take (0–255), and watching several YouTube videos before it dawned on me… oh right! So I changed the analogWrite(ledPin, HIGH) to digitalWrite(ledPin,50) and moved the pin from 13 (Digital) to 9 which could handle analog…
Using the same code as before and it worked:
if (sensorValue < darkValue){
  analogWrite(ledPin, 180);
}
else{
 analogWrite(ledPin, 20);
}
Mapping the photocell value to the LED output value
So my range of values that I was getting from the photocell was about 0–100 when I pointed a light bulb right at it. I could write those values directly to the LED output but that won’t make it very bright. So lets get this a bit closer to 255. If I want the upper value (100) to be closer to 255 I could just multiply by 2.5 - which gets me 250.
Lets create a variable, do some math and write those values just to see if if does indeed do what I’m expecting. I don’t need the if/then, so the code in loop() just becomes:
// Make the upper value of the photocell value to upper limit of LED output
int sensorToLEDvalue = sensorValue * 2.5;

// Send the calculated value to the LED
analogWrite(ledPin,sensorToLEDvalue);
That does indeed make the LED darker when it’s dark in my room and brighter when the lights are on. Which is what I was looking to do.
The full backlight code:
// Pin# of the photocell
int sensorPin = 0;

// Pin# of the LED
int ledPin = 9;

void setup() {
  // Start communication to get values
  Serial.begin(9600);

  // Set the LED pin output
  pinMode(ledPin, OUTPUT);
}
void loop() {
  // Get the value from the photocell
  int sensorValue = analogRead(sensorPin);

  // Make the upper value of the photocell value to upper limit of
  // LED output
  int sensorToLEDvalue = sensorValue * 2.5;

  // Send the calculated value to the LED
  analogWrite(ledPin,sensorToLEDvalue);

  // Delay for a bit
  delay(100);
}
Brighten an LED when the room gets darker
How about we keep going and see if we can get the LED to dim when the environment is bright and get more bright when the environment gets darker.
In order to do that we need to reverse the values, the higher the number being read from the photocell, the higher the output to the LED. We want to use map() to get what we are looking for. Map takes 5 values, the value you are mapping, the input range and the output range.
// Map the upper value of the photocell value to lower limit of LED output
int sensorToLEDvalue = map(sensorValue, 0, 100, 255, 0);
Pushing that to the board now does exactly what I would expect, with one exception - while reading the serial of sensorToLEDvalue I got a negative number because 100 wasn’t quite the upper bound.
We want to make sure it stays positive so we need to make the upper bounds of the readout to never go above 100, assuming we will make it full brightness at that point. So before passing that value to map() lets make sure it’s never larger than 100:
// If sensorValue is above 100, let's keep it at 100.
if (sensorValue > 100) { sensorValue = 100}
That will keep the negative numbers away and now functions as I’d expect.
The full reverse backlight code:
// Pin# of the photocell
int sensorPin = 0;

// Pin# of the LED
int ledPin = 9;

void setup() {
  // Start communication to get values
  Serial.begin(9600);

  // Set the LED pin output
  pinMode(ledPin, OUTPUT);
}

void loop() {
  // Get the value from the photocell
  int sensorValue = analogRead(sensorPin);

  // If sensorValue is above 100, let's keep it at 100.
  if (sensorValue > 100) { sensorValue = 100}

  // Map the upper value of the photocell value to lower limit of the LED output
  int sensorToLEDvalue = map(sensorValue, 0, 100, 255, 0);

  // Send the calculated value to LED
  analogWrite(ledPin,sensorToLEDvalue);

  // Delay for a bit
  delay(100);
}
That brings us to the final task at hand.
Creating an emergency light by blinking an LED when the lights go dark
I figured out detecting darkness in the first project and turning the LED on and off based on the photocell value. Instead of just turning it on, how about we create a function that turns it on and off repeatedly?
// Function to Blink the LED
void blinkLED(){
  analogWrite(ledPin, 255);
  delay(20);
  analogWrite(ledPin, 0);
  delay(20);
}
Then let’s just call that function when we check if the sensorValue is less than the darkValue we set:
// Check the value of the sensor and if it's dark then blink the
// LED, if not turn it off.
  if ( sensorValue < darkValue ){
    blinkLED();
  }
  else{
    analogWrite(ledPin, 0);
  }
Pushed that onto the board and, holy crap, worked on the first try! I think I’m getting the hang of all this.
The full emergency light code
// Pin# of the photocell
int sensorPin = 0;

// Pin# of the LED
int ledPin = 9;

// The value when it's dark
int darkValue = 5;

void setup() {
  // Start communication to get values
  Serial.begin(9600);

  // Set the LED pin output
  pinMode(ledPin, OUTPUT);
}

// Function to Blink the LED
void blinkLED(){
  analogWrite(ledPin, 255);
  delay(20);
  analogWrite(ledPin, 0);
  delay(20);
}

void loop() {
  // Get the value from the photocell
  int sensorValue = analogRead(sensorPin);

  // Check the value of the sensor and if it's dark then blink the
  // LED, if not turn it off.
  if ( sensorValue < darkValue ){
    blinkLED();
  }
  else{
    analogWrite(ledPin, 0);
  }
Can’t wait to move on to some more complicated ideas and see what all those Arduino accessories are (like what the heck is a servo?). So that is all I’ve got so far for smart lighting on the Arduino and I’m looking forward to sharing what else it is I’m doing next.
When I was tasked with creating an interactive story based on a children’s book that had to include some form of randomness and build on some of the things we’ve learned in the first 2 weeks of my class on p5.js — Chicka Chicka Boom Boom was the first thing that came to mind — so I ran with it.
tldr; Made a game that you or your kids should play: Chicka Chicka Boom Boom Game Demo
The setup
Chicka Chicka Boom Boom is a children’s book that helps kids to learn the alphabet by turning the letters into characters and telling a story of how they go to a party and fall out of a tree — something like that. I only read it a handful of times when my kids were little and I was a bit too old to grow up on it (it was published in 1989).
The design of the book is bright, the typeface is bold, and the rhyming wants to make you get loud and excited when reading it.
Design Goals
My idea seems simple — Create an interactive game based on the story — letters will be piled up on each other after they’ve fallen out of the tree and the player will need to find each letter in ABC order.
The design should mimic the bold lettering and bright visuals from the book.
After placing the letters back into the tree, the player should be given the opportunity to play it again.
Development Goals
-
Each letter will be assigned a color and added onto the canvas in the scene so that that are spread out, skewed and in no particular order.
-
At the top of the screen there will be an indicator on which letter the player should be looking for and direction on how to play.
-
If a player selects the wrong character, it will make a sound indicating an error.
-
If the player selects the correct character, a sound will indicate that they were correct, it will be removed from the pile, placed on top of the tree and the indicator will change to the next letter.
-
After the user finds the last letter, a sound will indicate they’ve completed it and will be prompted to play it again.
The code in this morphed quite a bit as I added in features and effed up some things so I’m only going to share some chunks of code, but you can check out the working demo and the final code at the end. Let’s make this happen.
Random letters on the canvas
I started out by creating the alphabet and storing it into an array, then cycling through each letter and assigning a random position on the canvas:

The look of the letters
The typeface in the book used for the letters is very blocky. A quick google search and of course the Chicka Chicka Boom Boom font is a thing and easily imported.
The color palette used in the book is bright and very limited — maybe 10 colors in all, so I stored those in a color palette array and assigned the letters a random color as I placed them on the canvas.

Mimicking the book design
There is one page in the book when all the letters fall out of a tree that I used as inspiration for the game page — I made the tree in SVG and created the border around the whole canvas by looping through the dots one by one and assigning a small bit of randomness. I could have been more clever with the measurements but, for the sake of sanity, I used a bunch of magic numbers to get it done.
function drawCirclePattern() {
  // Creates the dots that surround the canvas
  var numberOfRows = 19
  var numberOfColumns = 38
  var radius = 14
  var marginX = 34
  var marginY = 38
  var xPosition = 20
  var yPosition = 16
  var rotation = 0

  fill ( 215, 21, 101 )

  // Create each row
  for (j = 0; j < numberOfRows; j++ ){
    // Create each column's circle
    for (i = 0; i < numberOfColumns; i++ ){
      // Add the circle with a little bit of randomness for the Y position
      ellipse( xPosition, yPosition + ( random( -3, 3 ) ), radius, radius )
      xPosition += marginX
    }
    // Offset the even numbered rows
    if ( j % 2 == 0 ){
      xPosition = -41
    }
    else{
      xPosition = 20
    }
    yPosition +=  marginY
  }
}
and got it looking pretty darn close to the actual look of the page:

Positioning the letters on the canvas
I couldn’t get away with random positions on the canvas — the letters needed to be in their own spot and not overlapping the other characters.
I chose to actually define 26 different positions on the canvas that each letter could go into so that I could get more control of their placement. I stored those in an array and assigned each letter randomly to one of those positions.
I also created a small bar at the bottom of the screen to indicate what letters had been found.
At this point I had forgotten the fact that I wasn’t storing the random positions, rotation and color for each of the letters so when I ran it, it produced a seizure inducing affect of creating and randomizing the alphabet on top of the existing one:

Whoops. 10 minutes of trying to figure out if I could get away with noLoop() later and ended up extending my alphabet array to include the positions, color and rotations — only calling that once. Whew:

Mouse events and keeping track of the letters
At the start of the program, I set which letter is the first to be found and use that as the alphabet is being drawn onto the page so that I can color it gray and also to display, at the bottom, which ones the player has found.
The coloring was simply done like this during the loop of placing the letters on the page:
if (alphabet.indexOf(currentLetterToFind) > i){
  fill( 220 , 220, 220 )
}
else{
  // Assign the stored color value
  fill( alphabet[i][4] )
}
A mouse looks to see if the click happens close to the coordinates of the current letter to be found:
var clickDistance = dist ( mouseX, mouseY, currentLetterToFind[1], currentLetterToFind[2] )
if (clickDistance < 50 ){
  var currentLetterIndex = alphabet.indexOf(currentLetterToFind)
  var nextLetterIndex = currentLetterIndex + 1
}
And the game ends up looking this this as it progresses:

A starting and congratulations screen
It’s not much of a game without a great intro screen and a screen for indicating you’ve won! So I set out to create 2 additional scenes. A new vector that looks like the book cover and some more color choices and buttons later and I had this:
Intro screen

Play again screen

QA and the need for some competition
At this point, the game was working smoothly, so I volunteered my kids to do a little quality assurance. They thought it was cute and were kinda surprised I had it in me — but it wasn’t enticing enough for them to play it more than once.
They definitely came up with some far out ideas on how to improve it, but not anything that I’d want to try to make happen for this assignment.
But, I decided that there’s nothing better than a little healthy competition to get them on each other’s nerves — so I decided I’d add in a timer so that we could race each other’s best times.
Time is complicated — mainly because of math and the fact that noon rolls into 1 and 59 rolls into 1 and their aren’t any good built in functions for calculating how much time has passed.
So I decided I would just keep track of each drawn frame and assuming there’s about 60 frames running per second, I would just estimate the number in seconds.
Ending up with this:

The final code and working demo
I did my best to make the code as clear and commented as I could, but before you delve into it, check out the working demo of the Chicka Chicka Boom Boom Game.
// Set the starting scene
var scene = 0

// Setup some global variables
var alphabet = []
var currentLetterToFind
var positions

// Store the frames as the game is played to be used as a timer
var numberOfFrames = 0

// Set a default winning text to be randomized later
var finalWinningText = "Wow!"

// Color of the letters
var colorPalette = [
  [ 240, 0, 100 ],
  [ 247, 90, 29 ],
  [ 8, 170, 143 ],
  [ 242, 24, 67 ],
  [ 243, 162, 32 ],
  [ 1, 170, 254 ],
  [ 86, 72, 157 ],
  [ 0, 120, 194 ],
  [ 120, 100, 170 ],
  [ 251, 196, 14 ]
]

// Different congradulations text
var congratsText = [
  "Great Job!",
  "Wow!",
  "You Rock!",
  "Fantastic!"
]

function setupPositions(){
  // Positions of the letters on the canvas
  positions = [
    [ 497,362 ],
    [ 613, 362 ],
    [ 181, 437 ],
    [ 352, 437 ],
    [ 468, 437 ],
    [ 584, 437 ],
    [ 700, 437 ],
    [ 816, 437 ],
    [ 932, 437 ],
    [ 164, 525 ],
    [ 336, 525 ],
    [ 452, 525 ],
    [ 568, 525 ],
    [ 684, 525 ],
    [ 800, 525 ],
    [ 916, 525 ],
    [ 1032, 525 ],
    [ 134, 623 ],
    [ 245, 623 ],
    [ 365, 623 ],
    [ 481, 623 ],
    [ 597, 623 ],
    [ 713, 623 ],
    [ 829, 623 ],
    [ 956, 623 ],
    [ 1058, 623 ]
  ]
}

function preload(){
  // Import Font
  font = loadFont( "ccbb.ttf" )

  // Import Images
  treeImage = loadImage( "tree.svg" )
  treeIntroImage = loadImage( "tree-intro.svg" )

  // Import Sounds
  soundFormats( "mp3" )
  yeahSound = loadSound( "yeah.mp3" )
  waSound = loadSound( "wa.mp3" )
}

function sceneIntro() {
      // Start Screen

      // Create the white canvas over the background border
      var canvasWidth = width - 156
      var canvasHeight = height - 80

      fill( 254, 207, 65 )
      rect( 78, 80, canvasWidth, canvasHeight )

      // Title
      textSize( 120 )
      textAlign( RIGHT, RIGHT );
      fill( 120, 71, 179 )
      text( "Chicka", 1050, 200 )
      text( "Chicka", 1050, 300 )
      fill( 88, 203, 181 )
      text( "Boom Boom", 1050, 400 )
      text( "Game", 1050, 500 )

      // Image
      image( treeIntroImage, -10, 70 )

      // Start Button
      fill( 204, 59, 76)
      rect( 750, 600, 300, 100)
      textSize( 60 )
      fill( 255, 255, 255)
      text( "START", 1000, 670 )

}

function sceneCongrats(){
  // Ending Screen

  // Create the white canvas over the background border
  var canvasWidth = width - 156
  var canvasHeight = height - 80

  fill( 255,255,255 )
  rect( 78, 80, canvasWidth, canvasHeight )

  // Congradulations Text
  textSize( 120 )
  textAlign( RIGHT, RIGHT );
  fill( 120, 71, 179 )
  text( finalWinningText, 1050, 300 )
  fill( 88, 203, 181 )
  text( "You Won", 1050, 400 )

  // Show how long it took based on number of frames accumulated
  var calulatedSeconds = Math.floor( numberOfFrames / 60 )
  textSize( 50 )
  fill( 253, 155, 30 )
  text( "In  " + calulatedSeconds + "  seconds", 1050, 500 )

  // Tree Image
  image(treeIntroImage, -10,70)

  // Play Again Button
  fill(204,59,76)
  rect(650, 600, 400, 100)
  textSize( 60 )
  fill(255,255,255)
  text("Play Again", 1000, 670)
}

function randomizeAlphabet(){
  // Assign the position on the canvas, rotation and color values for each letter
  for ( i = 0; i < 26; i++ ){
    var randomColor = Math.floor( random( 0, 9 ) )

    // Pick a random position on the canvas to go into
    var randomPosition = Math.floor( random( 0, positions.length ) )

    // Take the positions stored in the position array and store them
    // as the character's position
    var characterPositionX =  positions[ randomPosition ][ 0 ]
    var characterPositionY = positions[ randomPosition][ 1 ]

    // Push that posision into the alphabet array
    alphabet[i][1] = characterPositionX
    alphabet[i][2] = characterPositionY

    // Randomly rotate the letter and store that in the array
    var randomRotation
    var positiveOrNegative = random( 0, 1 )
    if (positiveOrNegative > .5 ){
      randomRotation = random( 0, 120 )
    }
    else{
      randomRotation = -random( 0, 120 )
    }
    alphabet[ i ][ 3 ] = randomRotation

    // Randomly assign a color from the stored color palette
    alphabet[ i ][ 4 ] = colorPalette[ randomColor ]

    //remove the used position from the array
    positions.splice(randomPosition, 1)
  }
}

function setup() {
  createCanvas( 1200, 750 )
  noStroke()
  angleMode( DEGREES )
  background( 253, 155, 30 )

  // Setup the array of characters with placeholder values for x, y, color, and rotation
  // using the ascii character code, in case I want to do lowercase or other characters
  for ( var z = 65; z < 91; z ++ ){
     var currentCharacter = String.fromCharCode( z )
     alphabet.push( [currentCharacter, 0, 0, 0, 0 ] )
  }
  // Set the first letter to be found in the game
  currentLetterToFind = alphabet[ 0 ]

  // Create the dots that surround the canvas
  drawCirclePattern()

  // Get the list of all the positions available on the canvas
  setupPositions()

  // Randomize the order of the alphabet and attach x, y, rotation, and color
  randomizeAlphabet()
}

function drawCirclePattern() {
  // Creates the dots that surround the canvas
  var numberOfRows = 19
  var numberOfColumns = 38
  var radius = 14
  var marginX = 34
  var marginY = 38
  var xPosition = 20
  var yPosition = 16
  var rotation = 0

  fill ( 215, 21, 101 )

  // Create each row
  for (j = 0; j < numberOfRows; j++ ){
    // Create each column's circle
    for (i = 0; i < numberOfColumns; i++ ){
      // Add the circle with a little bit of randomness for the Y position
      ellipse( xPosition, yPosition + ( random( -3, 3 ) ), radius, radius )
      xPosition += marginX
    }
    // Offset the even numbered rows
    if ( j % 2 == 0 ){
      xPosition = -41
    }
    else{
      xPosition = 20
    }
    yPosition +=  marginY
  }
}

function collectedArea(){
  // Create the area that indicates what letter needs to be found
  // Position on the canvas for the text to sit
  var abcPositionX = 150

  // The current letter that needs to be found
  var currentLetterIndex = alphabet.indexOf( currentLetterToFind )

  // The "Letters Found " text
  fill( 204, 59, 76 )
  rect( 0, 680, width, 70 )
  fill( 255, 255, 255 )
  textSize( 30 )
  text( "Letters Found: ", abcPositionX, 715 )

  // Position for the letters on the canvas
  abcPositionX = 280
  for (k = 0; k < currentLetterIndex; k++ ){
    text( alphabet[k][0], abcPositionX, 715 )
    abcPositionX +=35
  }
}

function draw() {
  textFont(font)
  // Determine which scence should be shown
  if (scene == 0) { sceneIntro() }
  else if(scene == 3){ sceneCongrats() }
  else{
    // The game screen
    // Create the white canvas over the border
    numberOfFrames++
    var canvasWidth = width - 156
    var canvasHeight = height - 80

    fill( 255, 255, 255 )
    rect( 78, 80, canvasWidth, canvasHeight )

    setupPositions()

    // Add in the tree
    image(treeImage, 160,-10)

    // Draw the letters on the page
    for ( i = 0; i < 26; i++ ){
      // Keep track of what the current letter to find is
      var currentLetterIndex = alphabet.indexOf(currentLetterToFind)

      // If the letter has already been found, make it gray
      if (alphabet.indexOf(currentLetterToFind) > i){
        fill( 220 , 220, 220 )
      }
      else{
        // Assign the stored color value
        fill( alphabet[i][4] )
      }

      // Text settings
      textSize( 120 )
      textAlign( CENTER, CENTER );

      // This is where we rotate the letters
      // Move the origin of the canvas to the center of the character
    	translate(alphabet[i][1], alphabet[i][2]);
    	rotate(alphabet[i][3])

      // Set the letter, position is 0,0 becuase the orgin shifted to its stored
      // coordinates
      text( alphabet[i][0], 0, 0)

      // Reset the translation and rotation, because those are accumulated
      rotate(-alphabet[i][3])
      translate(-alphabet[i][1], -alphabet[i][2])

      // Remove the used position from the array, can't have more than one letter
      // in the same spot
      positions.splice(alphabet[i][3], 1)
    }
    // Add in the "Letters Found" area
    collectedArea()
  }

}

function mouseClicked(){
  // Check if it's the intro splash scene
  if (scene == 0){
    // Only allow clicking on the button
    if (mouseX > 750 && mouseX < 1050 && mouseY > 600 && mouseY < 700){
      setup()
      scene = 1
    }

  }
  // Check if it's the congrats scene
  else if (scene == 3){
    // Only allow clicking on the button
    if (mouseX > 750 && mouseX < 1050 && mouseY > 600 && mouseY < 700){
      setup()
      scene = 1
      // Reset the timer
      numberOfFrames = 0
    }

  }
  else{
    // During the game, check if the user has clicked the current letter
    var clickDistance = dist ( mouseX, mouseY, currentLetterToFind[1], currentLetterToFind[2] )
    if (clickDistance < 50 ){
      // Play a sound that you found the right letter
      yeahSound.setVolume(1);
      yeahSound.play();
      // Increment the next letter to be found
      var currentLetterIndex = alphabet.indexOf(currentLetterToFind)
      var nextLetterIndex = currentLetterIndex + 1
      if (nextLetterIndex == 26){
        // All the letters were found!
        // Pick a random congrats text
        finalWinningText = congratsText[Math.floor(random(0,3))]
        // Go to the congrats scene
        scene = 3
        setup()
      }
      else{
        // User is still finding the letters, go find the next letter
        scene = 1
        currentLetterToFind = alphabet[nextLetterIndex]
      }
    }
    else{
      // Didn't find the right one
      waSound.setVolume(1)
      waSound.play()
    }
  }
}After going through a bit of history on using computers to make art, my second class on p5.js had us attempt to be inspired by geometric artwork and write code to make something cool.
In about an hour and a half of coding, I ended up with this — randomly generated triangles in all kinds of colors.

We were tasked to continue working on it until we were happy with it — play around with shape, size and color.
I spun some things around in my head during a long commute — I’m determined to get all these triangles to be all connected and not overlap. It was something we discussed before starting the project but we deemed it too difficult to do consider we’re only 3 hours into learning p5. We looked at a library that accomplished it, but I needed to come up with my own solution.
I have a difficult time drawing while I’m driving so as soon as I managed to stop I sketched this out:

What if, instead of Random coordinates to create the triangles, I could
- setup a grid on the canvas
- randomly place the points in that grid
- store the coordinates in an array
- then manage to systematically go through and start using those points to create the new triangles
In my head it seems like it could work — getting rid of the randomness of the triangle generation.
Let’s see how far I get into this code before I realize how dumb I was to think this would work.
Setting up the grid
Just so I can see what my brain is thinking, I’m physically putting the grid onto the canvas:
function setup() {
  createCanvas( windowWidth, windowHeight )
  colorMode( HSB )
  noLoop()
  noStroke()
}
function draw() {
  background( 20, 20, 20)
  // Setup a grid so i can figure out the uppper and lower bounds
  // of where the points should go
  var columns = 5
  var rows = 5
  var columnWidth = ( windowWidth / columns )
  var columnHeight = ( windowHeight / rows )
  fill( 30, 30, 30)
  stroke( 90, 90, 90 )
  rect( 0, 0, columnWidth, columnHeight )
  // Create a row
  for ( i = 0; i < rows; i++ ){
    // Create a column
    for ( j = 0; j < columns; j++ ){
      rect( j * columnWidth, i * columnHeight, columnWidth, columnHeight )
    }
  }
}
Which ended up looking like this. I’m off to an okay start.

Generating the random points
I’m going to generate random points inside each grid using the upper and lower bounds based on the column width and height and use small circles to visualize where the points are being created.
So just in side the column loop:
for ( j = 0; j < columns + 1 ; j++ ){
  rect( j * columnWidth, i * columnHeight, columnWidth, columnHeight )
  //create my point
  var pointPositionX = random( j * columnWidth - columnWidth, j * columnWidth )
  var pointPositionY = random( i * columnHeight - columnHeight, i * columnHeight )
  circle( pointPositionX, pointPositionY, 10 )
}
and I get some points:

Storing the coordinates in arrays
I need to keep all these coordinates so that I can go back and create the triangles.
for ( i = 0; i < rows + 1; i++ ){
    var columnData = []
    // Create a column
    for ( j = 0; j < columns + 1 ; j++ ){
      rect( j * columnWidth, i * columnHeight, columnWidth, columnHeight )
      //create my point
      var pointPositionX = random( j * columnWidth - columnWidth, j * columnWidth )
      var pointPositionY = random( i * columnHeight - columnHeight, i * columnHeight )
      columnData.push( [pointPositionX, pointPositionY] )
      console.log( columnData )
      //circle( pointPositionX, pointPositionY, 10 )
    }
    allCoordinates.push( columnData )
    console.log( allCoordinates )
  }
It has been a few years since I’ve written some JavaScript but it’s seeming to fit like a glove. This is what was logged to the console. I think I somehow managed to do this nearly right* … except those negative numbers …

The first triangle
Yeah, so those negative numbers weren’t great. Math is weird sometimes for me — why would I be subtracting from 0? Who knows. I think I thought that i and j were 1’s? Whatever. Fixed it.
Also don’t know why I needed two arrays…I should just push all the coordinates to allCoordinates[].
So once all that was out the way, I wanted to make sure those first points were stored as I expected them and that I could make a triangle from them.
This is what the code ended up being:
var allCoordinates = [];
  // Create a row
  for ( i = 0; i < rows + 1; i++ ){
    // Create a column
    for ( j = 0; j < columns + 1 ; j++ ){
      rect( j * columnWidth, i * columnHeight, columnWidth, columnHeight )
      //create my point
      var pointPositionX = random( j * columnWidth + columnWidth, j * columnWidth )
      var pointPositionY = random( i * columnHeight + columnHeight, i * columnHeight )
      allCoordinates.push( [pointPositionX, pointPositionY] )
      circle( pointPositionX, pointPositionY, 10 )
      console.log(allCoordinates)
    }
  }
  // Create the first triangle
  fill( 90, 90, 90 )
  var currentPoint = 0
  var firstPointX = allCoordinates[0][0]
  var firstPointY = allCoordinates[0][1]
  var secondPointX = allCoordinates[1][0]
  var secondPointY = allCoordinates[1][1]
  var thirdPointX = allCoordinates[6][0]
  var thirdPointY = allCoordinates[6][1]
  triangle( firstPointX,
            firstPointY,
            secondPointX,
            secondPointY,
            thirdPointX,
            thirdPointY )
and the output:

Fantastic! Now I gotta loop through and do them all!
2 hours of crashing my browser later…
I spent a good bit of time working out how to cycle through each of the points in the array and creating 2 triangles for every point. I messed it up a lot given that I also had to figure out if it was in the first or last row or the last column — it was weird.
I finally got to a point where I was okay with the output and knew that if I just spent another hour on it I could have gotten in nearly perfect…but I was ready to just move on — I’m not trying to overachieve this.
I won’t share that code with you, but here’s how it was shaping up:

Back to the Art part of this whole thing
With some adjustments of the number of columns and rows, some creative cropping and some actual color choices I came up with a couple iterations before finally enjoying where it was headed. Getting closer…

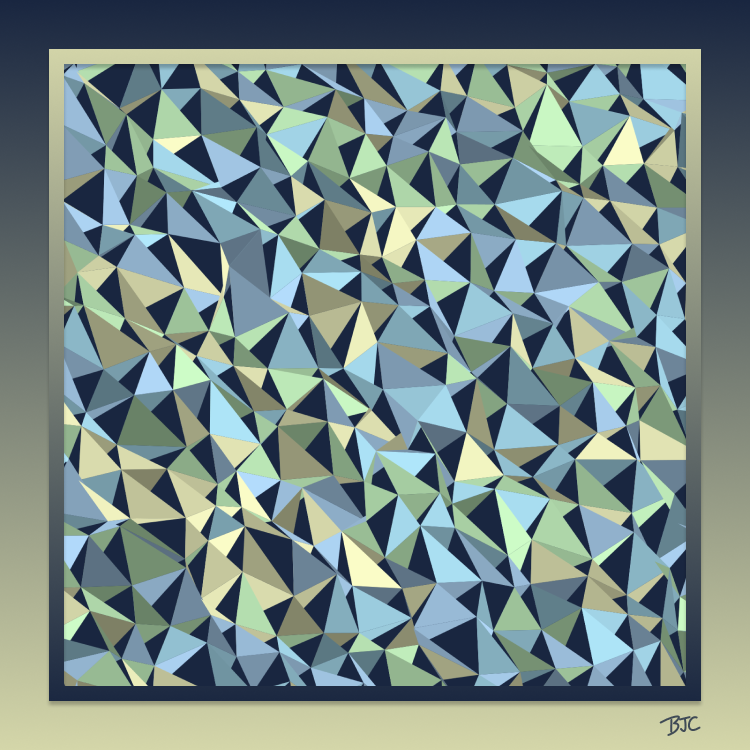
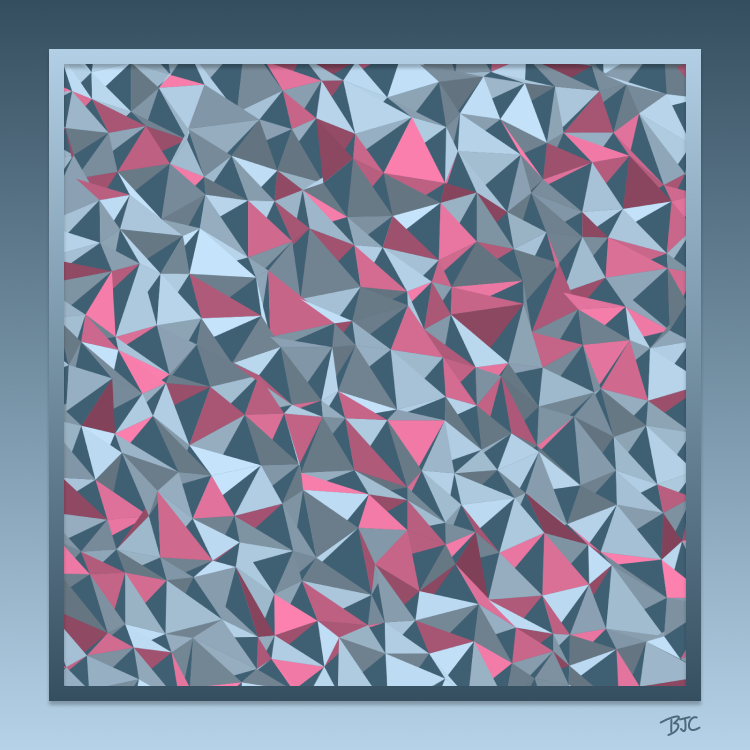
The final render and some pretty sloppy code
Finally, the renders started coming together to a better point — enough where I could say that I was done for now.
This is the final render:

And the p5.js code. Sorry, I was ready to call it done today so there’s no cleaning it up. Enjoy it.
function setup() {
  var canvas = createCanvas( 1600, 1600 )
  canvas.parent("canvasArea");
  colorMode( HSB )
  noLoop()
  noStroke()
}

function draw() {
  background( 197, 31, 65 )

  // Setup a grid so i can figure out the uppper and lower bounds
  // of where the points should go
  var columns = 20
  var rows = 20

  var columnWidth = 1600 / columns
  var columnHeight = 1600 / rows

  // Show the grid
  fill( 18, 11, 18 )
  //stroke( 90, 90, 90 )
  //rect( 0, 0, columnWidth, columnHeight )

  var allCoordinates = [];
  // Create a row
  for ( i = 0; i < rows; i++ ){
    // Create a column
    for ( j = 0; j < columns ; j++ ){
      rect( j * columnWidth, i * columnHeight, columnWidth, columnHeight )
      //create my point
      var pointPositionX = random( j * columnWidth + columnWidth, j * columnWidth )
      var pointPositionY = random( i * columnHeight + columnHeight, i * columnHeight )

      allCoordinates.push( [pointPositionX, pointPositionY] )
      circle( pointPositionX, pointPositionY, 10 )
    }
  }
  var whichRow = 1
  var l = 1
  while ( l < allCoordinates.length ){

    //firstTriangle
    if (whichRow == 1 || whichRow == rows){
      //don't do anything on the first and last row (thse need just one triangle)
    }
    else{
      if ( (l + 1) % rows == 0 || l == 0){
        console.log("it's the last item, do nothing")
      }
      else{
        //Triangle 1
        var colorChoices = [
          [45, 15, 75],
          [22, 42, 95],
          [5, 55, 75],
          [0, 61, 95]
        ]

        var randomColorChoice = Math.floor(random(0,4))
        fill( colorChoices[randomColorChoice][0], colorChoices[randomColorChoice][1], Math.floor(random(50,100)) )
        //stroke( 200, 90, 90 )

        var currentPoint = l
        var nextPoint = l + 1
        var bottomPoint = l + rows
        var firstPointX = allCoordinates[currentPoint][0]
        var firstPointY = allCoordinates[currentPoint][1]
        var secondPointX = allCoordinates[nextPoint][0]
        var secondPointY = allCoordinates[nextPoint][1]
        var thirdPointX = allCoordinates[bottomPoint][0]
        var thirdPointY = allCoordinates[bottomPoint][1]
        triangle(firstPointX, firstPointY, secondPointX, secondPointY, thirdPointX, thirdPointY)

        //Triangle 2
        randomColorChoice = Math.floor(random(0,4))
        fill( colorChoices[randomColorChoice][0], colorChoices[randomColorChoice][1], Math.floor(random(50,100)) )
        //stroke( 200, 90, 90 )

        var currentPoint = l
        var nextPoint = l - rows
        var bottomPoint = l + 1
        var firstPointX = allCoordinates[currentPoint][0]
        var firstPointY = allCoordinates[currentPoint][1]
        var secondPointX = allCoordinates[nextPoint][0]
        var secondPointY = allCoordinates[nextPoint][1]
        var thirdPointX = allCoordinates[bottomPoint][0]
        var thirdPointY = allCoordinates[bottomPoint][1]
        triangle( firstPointX, firstPointY, secondPointX, secondPointY, thirdPointX, thirdPointY )
      }
    }
    l++
    if ( l % rows == 0 ){ whichRow++ }
  }
}
Working demo
Check out the working demo.
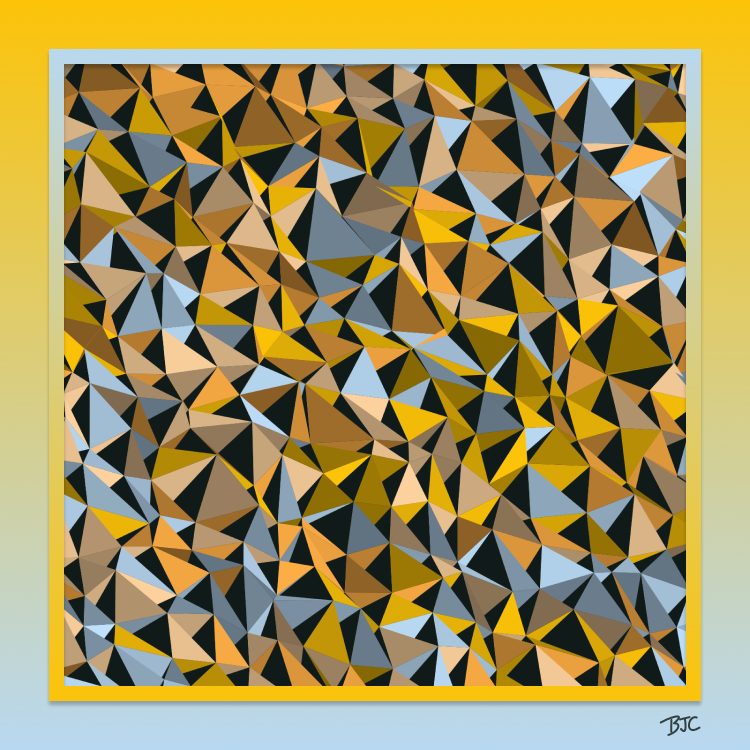
Available NFTs
If you want to support the work that I do and are cool enough to still think NFTs have potential, then check out the ones I’ve created here that are up for auction. This is just a small set of what I offer and if you want to acquire other work, just send me an email or check out what I have on OpenSea.
Help to support me
If you’ve found any of this inspiring and what to support me in everything that I create, there are a number of ways to do that, including donating crypto, buying me a coffee, or purchasing one of my zines. Check out my support page for more details, it would mean a lot to me.
In fact, if you every need to pick my brain on anything, grab some time on my calendar - I mean it, I love to give back so take advantage of the offer.
Thanks for stopping by!